Need to find something?

Click click click

Followers

Monday, April 25, 2011

The exposure triangle

A new technique for beginners...
Beginners tend to face problems why getting the right exposure. The shot has the perfect composition, perspective and everything, but unfortunately it's not perfectly exposed. Instead of getting frustrated with your camera and cursing, why not learn this technique called The Exposure Triangle? The concept is simple, tweak any one of them to compensate for the other. But first, let's go through what's in the exposure triangle...

The three components in the exposure triangle is:
  • ISO
  • shutter speed
  • aperture
Exposure Triangle
The ISO is the sensitivity of the sensor. The higher the ISO, the more sensitive the sensor will be. But, there are drawbacks from this. Noise, a term of the presence for colour pixels where there should be none, will start appearing. Now, DSLRs these days offer the NR feature(Noise Reduction) but do note that this will degrade your picture quality.

Moving on to the shutter speed. Like our eye, we have to blink. Quite similarly, the camera has to do the same to take a shot. Shutter speed means the shutter of which it opens and closes. The shutter speed itself is a very crucial tool depending on what your subject is. If you're after motion, you'll be needing a slower shutter speed like 1/2 second all the way to 10 seconds. If it's sports, then obviously you'll be needing a (very)fast shutter speed like 1/500 second to catch the action.

Lastly, aperture. Aperture is a term for the size of the lens' hole. The bigger the aperture, the more light enters. Other than the increase of light entering, you'll also get a shallower depth of field or more commonly used as DOF. I love bokeh shots(the isolation of the subject from the background as an effect from the depth of field) as it gives an interesting look to your shot. Getting faster lenses is perhaps the most effective way to compensate. However, do note that primes can come in quite costly especially at the far telephoto end.

From Digital Photography School
Digital Photography School gave a really good example of this technique:
The Window
Imagine your camera is like a window with shutters that open and close.
Aperture is the size of the window. If it’s bigger more light gets through and the room is brighter.
Shutter Speed is the amount of time that the shutters of the window are open. The longer you leave them open the more that comes in.
Now imagine that you’re inside the room and are wearing sunglasses (hopefully this isn’t too much of a stretch). Your eyes become desensitized to the light that comes in (it’s like a low ISO).
There are a number of ways of increasing the amount of light in the room (or at least how much it seems that there is. You could increase the time that the shutters are open (decrease shutter speed), you could increase the size of the window (increase aperture) or you could take off your sunglasses (make the ISO larger).
Ok – it’s not the perfect illustration – but you get the idea.

How does it work?
The concept is simple. Tweak either one of the settings to compensate for the other. Let's say, you are shooting at an ISO of 100, aperture of f/3.5 and a shutter speed of 1/60 second. You need the said shutter speed and your lens' fastest speed is f/3.5 but yet your shot is underexposed. Boost the ISO! That being said, you should know your limitations. ISO performance is usually good until ISO 1,600. Any higher, noise starts popping up.

Conclusion
Investing in an external flash and a fast prime will help you get the perfect exposure without risking the ISO performance or the shutter speed. Right now, the Nikon 50mm 1.8D and 35mm 1.8G is a steal. As for Canon, the 50mm 1.8 EF is very cheaply priced and it's a must for those starting out. Zooms offer versatility but there's a huge price to pay.

Friday, April 15, 2011

Nikon leaks a new AF-S 50mm 1.8G

New 50 1.8?
Two days ago, upon doing my research, I came across people 'foruming' about Nikon's latest 50mm 1.8G. True enough, it wasn't a rumour at all. It was on Nikon's USA site but just recently they removed it; its now a blank page. Glancing the specs, it has 7 elements including one aspherical element in 6 groups (as opposed to 6 elements in 5 groups).

Sharper than before?
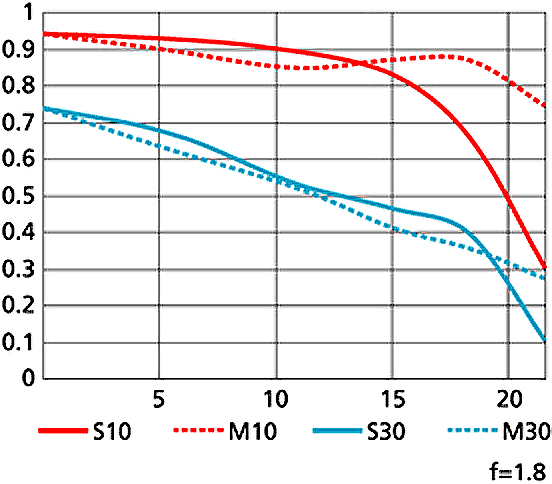
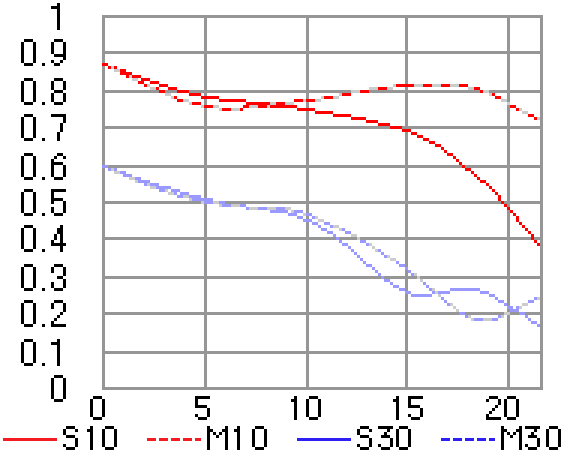
Nikon's MTF charts states that this lens is sharper and more contrasty.
50mm 1.8G MTF curve

50mm 1.8D MTF curve
Seems noticeably higher, doesn't it? Let's hope that it is that good.

Wait or just forget it?
I'm not sure how much the actual lens is, or whether it's actually sharper and more contrasty. If not, I rather go for the 1.8D unless the price is reasonably cheap - just like the 50 1.8D.  As Ken Rockwell said, "My only reservation, other than all the plastic, is that when Nikon did this same update to the f/1.4 lens, the distortion actually got worse than the older lenses!"

Saturday, April 2, 2011

Nikon D3100 vs D90

Nikon's latest camera, D3100 seems to be quite a performer especially due to the Nikon's latest EXPEED 2. Nikon's (almost)discontinued prosumer DSLR. The D90 won the TIPA European Photo & Imaging Award, in the "Best D-SLR Advanced" category back in May 2009. New doesn't necessarily mean it's better just like Canon's 600D compared to its predecessor the 550D. 


D3100 VS D90


1) Image quality/Resolution
Other than the new image processor, Nikon also added a brand new 14.2 megapixel sensor into the D3100. As exciting as it seems, you actually only get 2.1 megapixels more than the D90. Does it really help? Not necessarily. Nikon should've added something like an 18 megapixel sensor to compete with Canon. Winner: D3100


2) ISO Performance
This is where the D3100 truly shines. At ISO 100 till 800, results are almost the same. But when it reaches the 3,200 point, things start to get a bit noisier on the D90. Thanks to the EXPEED 2 processor the D3100 is able to get clean images all the way until ISO 6,400. Artoftheimage was really helpful to post an ISO performance comparison. Winner: D3100


3) Burst rate
Even though the D3100 is a newer camera, its still at the lower end and so Nikon just left the burst rate the same as the D3000's - 3 frames per second. The Nikon D90 has a burst rate of 4.5 frames per second. If you're looking for serious action shots, just skip this and look at the D7000 or D300S. Winner: D90


4) Lens compatibility
Both of these cameras are able to use all the lenses from Nikon. The D90 gets the slight edge here; it's able to autofocus AF-D and AF lenses whiles the D3100 can't. If you want a lens to autofocus on the D3100, you ought to be looking for an AF-S lens because it lacks an autofocus motor. However, both lenses aren't able to meter AI and AI-S lenses. Winner: D90


5) Video mode
Again, its no doubt that the D3100 has better video capabilities here. It features 1080p full HD movie recording. WOW. The D90 only does 720p movie recording(not full HD). Unfortunately, both are still limited to only 24 frames per second in HD mode. The D3100 has another trick under its sleeves; it autofocuses in video. The D90 can't. However, this autofocus feature in video mode is still pretty new and isn't really that reliable at times. Winner: D3100


6) Flash?
Both cameras support all external speedlights from Nikon. The D90 has the slight edge here because it supports Nikon's CLS or Creative Lighting System; a very easy-to-set-up-and-use wireless flash system. So, that means the D90 is able to exploit this advantage without buying any extra accessories. For the D3100, you have to buy a pocket wizard to have this feature. Winner: D90


7) Ergonomics
Its a no-brainer. The D90 has better ergonomics for sure. The grip just feels great. Its beefier, more comfortable and makes pressing the shutter a pleasure. The D3100 is OK, its meant for smaller hands. That's all I could say. Winner: D90


Conclusion
The D3100 is an awesome camera for any beginner. As long as you use an AF-S lens, you should be okay. In a long run, buying the D90 is a better investment. Using AF-D lenses is a cheaper alternative to AF-S lenses. The 50mm 1.8D(without autofocus motor) is just currently at RM400+ whereas the 50mm 1.4G(with autofocus motor) costs about RM1,700. It's more than 4 times more! Get a D90 if you're a true photographer and don't really care about Full HD movie recording. Get a D3100 if you're leaning more towards the movie side.

Wednesday, March 30, 2011

What a Pro would do

1) Use as few lenses as possible
A pro will use only the important ones or what he/she really needs. Planning is a must for pros as it determines what lens they'll use. Portraits? An 85mm or 105mm. Macro? A 180mm perhaps. Or wedding photography? 35mm and 50mm.

2) Plan ahead
How do you think pros get to their work place so fast? Well duh, they plan - in advance. If they're shooting for an event, they usually do their research like the venue, the best way getting to the place, the time and so on. The whole point of doing this is to ensure that you get those 'wow' shots instead of just stoning at a corner wondering.

3) Stay focussed and sharp
Because you're a pro, people expect you to take pictures and do your job instead of slacking and stoning. Being blur in an event is an obvious no-no. Maybe for an enthusiast but not for a pro.

4) Show your 'pro' skill
Well, this is more of a should than a would. But anyway, since you're a pro why not show your skill? Not show off, dude. Post your shots on sites like Flickr perhaps and people might just praise you if they are good shots.

5) He/She is always out of the box
Pros generally should think out of the box. That's how they get shots that stand out from the others. If one is able to change the composition as well as the lighting, I think that would make a great image that stands out from others. Since everyone has creativity, its a matter of how creative you are.


Conclusion
Obviously a beginner can't be a pro immediately once he takes a camera and starts shooting. You need experience, dude. And time can only be one's friend in becoming a pro. Start by taking shots from a different angle and focus more on composition and lighting. Photography is all about creativity. Its just a matter of how creative one is.

Monday, March 28, 2011

Product Photography: Without External Speedlights/Strobes

Product photography might just be the most expensive genre of photography mainly because you have to spend a lot on external accessories like speedlights or strobes and the list keeps on going. Go to Sharpics.com - they sell a whole variety of equipment just for product photography.

In this post, I'll be showing you guys how to do product photography on a (serious)budget. And what you need for this is:

  • A camera(it's better if it's a DSLR, but a manual point and shoot camera will just be fine)
  • A tripod that holds your camera steady while you're taking your shot.
  • A place with plenty of natural light.
  • A plain background(doesn't necessarily have to be white) like a table, cloth, or anything you can find in your household.
Once you have all these stuff; you're ready to start:
  1. First, turn your camera to M(Manual Mode) on your mode dial.
  2. Turn on your built in flash.
  3. Turn down the flash compensation to about 2-3 stops.
  4. Go into your menu > switch from iTTL flash to Manual > set 1/32(on my D5000, that's the fastest but if your camera supports a faster flash speed, use that instead)
  5. Your fastest shutter speed should not be higher than 1/8 of a second(yes, it's pretty slow)
  6. Mount your camera onto a tripod(make sure its secure!)
  7. Place your product on a surface(a cloth over a table is recommended)
  8. Start your product shots :)
If you do follow the steps I've just said, you should be able to get nice exposed shots. The trick is, the slower the shutter speed the better the image will be. Why? Simple. The faster the shutter speed, the more light from the flash is going to captured in that image. As I said before, if you're going on a budget like me, you should consider this 'method'.

Drawbacks:
  • You might need a tripod.
  • You need a rather slow shutter speed(the fastest shouldn't be higher than 1/8 second)
  • Its a trial and error thing, no one setting is always perfect.
  • You can't use a long zoom as it will cast a shadow in your shot.
Sample shots:


Ads

Free Ads